

Accessibility Tools for Online Learning & Training
Practical tools to build accessible learning materials, test your existing content, and fix problems in minutes.
These free accessibility testing tools can help you meet and go beyond WCAG and ADA requirements to make your content easier for everyone to use.
The one argument for accessibility that doesn’t get made nearly often enough is how extraordinarily better it makes some people’s lives. How many opportunities do we have to dramatically improve people’s lives just by doing our job a little better?"
Nothing you paste or upload is saved or shared. Your content stays in your browser and is never sent anywhere, so no one else can see it.
Jump to a section
How to use this page
Finding the right tool
Use the buttons under “Jump to a section” to go directly to specific tools or open one of the tabs below to see which tools to use for what you’re working on.
Using the tools
To use a tool, paste your content or answer a few questions, select the button to check it, and read the results, which explain what to fix and how. If you want to see how a tool works before you paste your own content, select “See example” on tools that have one. You don’t need an account, and there’s nothing to install. Some tools let you download your results, and those files go straight to your device. We don’t track them or keep a copy.
Your content isn’t saved or shared
Everything you paste or upload stays in your browser, so you can check exam questions and other course materials without anyone else seeing them. We don’t save, track, or keep a copy of anything you paste, upload, or download.
What these tools check that your LMS doesn’t
The accessibility checker in your LMS looks for problems like missing alt text and headings out of order. These tools check things other things, such as how readable your text is, how your content looks to someone with color blindness, and whether your captions are accurate.
Coming back later
This page is a living, breathing resource that we’ll routinely update because accessibility standards and the ways people build course and training content keep changing.
Select “Save this page” to bookmark it so you can find it again whenever you’re building or updating content.
Use these tools on anything you write for learners, such as course pages, directions, announcements, emails, and training materials. You can use them individually or try using them in this order to get the most out of each one.
- Paste your text into the Readability Checker to see how hard it is to read.
- Use the Sentence Length Checker to find the sentences you should split in two.
- Paste the same text into the Acronym and Jargon Finder to find terms learners may not know.
- Finish with the Line Length Checker to make sure your text doesn’t get cut off when a learner adds space between lines and letters.
If you’re choosing a font for a document or slide deck, use the Font Size Comparison to see which fonts are easiest to read at the size you plan to use.
Slides, graphics, and banners
- Check any text on a colored background with the Color Contrast Checker.
- Use the Color Blindness Simulator to see whether your slides still make sense to someone who can’t tell certain colors apart.
- If your slides have a lot of text, use the Font Size Comparison to pick a text size that’s easy to read on a projector or a small screen.
Images, charts, and diagrams
- Answer a few questions about your image in the Alt Text Writer, and it writes a draft description for you.
- Read the draft out loud and change anything that doesn’t sound right.
- For charts and graphs, check the colors with the Color Blindness Simulator. Learners with color blindness have trouble reading a chart that uses only color to tell its lines or bars apart.
Videos and recorded lectures
- Check the caption file with the Caption Checker before you post the video.
- Use the Color Contrast Checker on any text that appears on screen.
- If you embed the video on an LMS page, use the Magnification Preview to see whether the video player shrinks to the width of the screen when a learner zooms in.
Building or updating a page or document
Use these tools in order whenever you add or change a page in your LMS or create a document in Word or Google Docs.
- Paste your content with its formatting into the Heading Checker to confirm your headings are in the right order. Screen reader users move through a page or document by its headings.
- Check any tables with the Table Checker.
- Use the Hyperlink Text Checker to make sure each hyperlink tells learners where it goes.
- Finish with the Screen Reader Preview to hear the content the way learners who use screen readers will. For LMS or website pages, also use the Magnification Preview to see how the page looks when a learner zooms in.
If you plan to share a document as a PDF, check the Word or Google Docs file before you save it as a PDF. When you save it, turn on the option that keeps accessibility tags so the headings and alt text carry over into the PDF.
Reviewing a whole course before it opens
- Pick your course home page, a few module pages, and the documents learners use most, such as the syllabus.
- Check each one with the Screen Reader Preview and the Heading Checker, which will show you the biggest problems first.
- Go to the section of this page that matches what you find, such as Colors for slides or Visuals for images that need alt text.
Exams and accommodations
Writing an exam, quiz, or assignment
- Check your questions and directions with the Readability Checker.
- Paste them into the Acronym and Jargon Finder to find terms learners may not know.
- If your questions include math, use Equation Alt Text to write descriptions a screen reader can read aloud.
- Use the Table Checker to confirm that any data tables in your questions have the headers a screen reader needs.
Setting up accommodations for a proctored exam
- Open the Accommodation Builder and select what the learner is approved for, such as a restroom break or multiple monitors.
- Review what the builder writes, which includes a note that tells proctors what the learner is allowed to do, an email to send the learner, and a list of the settings to change in your LMS. If it looks good, use it.
Colors
Check that your text stands out from its background and see how your slides, charts, and course pages look to someone with color blindness.
Nothing you paste or upload is saved or shared.Your content stays in your browser and is never sent anywhere.
Save this page to use again
Press Ctrl + D to bookmark this page for later.
Large text example
Browser lockdown software doesn't really prevent cheating on online exams.
Enter a hex code, such as #0676E0, or use the color picker.
| Normal text | Large text | |
|---|---|---|
| Level AA | ||
| Level AAA |
Text that blends into its background is hard to read, especially for people with low vision or color blindness.
This checker tells you whether your text and background colors meet WCAG accessibility standards.
Enter your text and background colors to see the contrast ratio and whether they pass Level AA, which most accessibility laws and policies require, and Level AAA, which sets a higher standard for readability.
Contrast ratios each level requires
- Normal text: 4.5:1 for AA & 7:1 for AAA
- Large text (24px, or 18.66px if bold): 3:1 for AA & 4.5:1 for AAA
- Icons, buttons, and form fields: 3:1 for AA
This tool processes files within the browser, so nothing you upload is saved.
We don’t upload, download, or store them. We can’t see or access your files.
Drop a slide, chart, or screenshot here
Type of color vision deficiency
Text & Readability
See how hard your text is to read, which sentences to split, and whether text gets cut off when someone adds space between lines and letters.
Nothing you paste or upload is saved or shared.Your content stays in your browser and is never sent anywhere.
Save this page to use again
Press Ctrl + D to bookmark this page for later.
Swipe for more text tools →
Paste your course content to see how easy it is to read and which sentences may be hard to follow.
Your results will appear here
Paste your text, then select Check readability.
Results
Flesch-Kincaid grade level
0.0
Other readability scores
Text statistics
Sentences to review
A hard sentence scores at a 10th to 13th grade level on the Flesch-Kincaid formula, and a very hard sentence scores at 14 or higher.
Font size sets the height of the space around each letter, not the height of the letters themselves. That’s why two fonts set to 24px can look like two different sizes.
It’s also why a font can meet the accessibility definition of “large text” and still be too small for some learners to read.
Think back to writing on lined paper in school. Everyone wrote between the same two lines, but some filled the whole space with biiiiig letters and wiiiiide m’s and w’s, while others wrote small and narrow with room to spare.
Fonts do the same thing, so this tool puts them side by side at the same size and so you can compare them.
How font size affects color contrast requirements
WCAG uses the px size to decide how much contrast your text needs, since smaller text is harder to read.
- Large text (24px, or 18.66px if bold) needs a contrast ratio of at least 3:1.
- Normal text (anything smaller) needs at least 4.5:1.
If your font has thin strokes or small letters, or you’re not sure whether your text counts as large, give it a contrast ratio of at least 4.5:1, which meets the requirement for normal and large text.
The first sentence below uses Arial, the second uses Times New Roman. Both are at 18px.
See the difference in these sentences?
See the difference in these sentences?
The first sentence below uses Arial, the second uses Times New Roman. Both are at 18px.
See the difference here?
See the difference here?
Font size comparison
The same font size can look bigger or smaller depending on the font. Pick a few fonts to compare how big each one looks at the size you choose.
Fonts to compare
How tall the letters are
Fonts with taller lowercase letters look bigger and are easier to read at small sizes.
- Capital letter height
- Lowercase letter height
Your text in each font
Long lines tire readers out. Once a line passes about 75 characters, the eye loses its place on the way back to the left margin, so people reread or skip lines without realizing it. Lines under 45 characters make reading feel too choppy because they split sentences into fragments.
Aim for 45 to 75 characters per line, including spaces. WCAG sets 80 as the maximum at the AAA level.
Keep your text area between 360px and 600px wide.
That gives you 45 to 75 characters per line.
Characters per line
- 45 to 75
- 40 to 44 or 76 to 79
- Under 40 or 80 and up
- Last line of a paragraph
Narrow the text area to 600px to keep lines around 66 characters.
How to do it
In Canvas or another LMS
LMS pages stretch to the full width of the browser, so long lines are common. Open the page in the HTML editor, paste this code, and put your text where it says to.
<div style="max-width: 65ch;">
Your text goes here
</div>
Copied
On a website
Add max-width: 65ch to the box that holds your text. In WordPress and most page builders, the text block or column has a maximum width setting you can use instead.
In Word or Google Docs
Make the left and right margins wider. In Word, go to Layout, then Margins, then Custom Margins. In Google Docs, go to File, then Page setup. Margins of about 1.5 inches keep 12 point text in range.
If your text is small
Bigger text puts fewer characters on each line. If your text is under 16px, raising the size can fix long lines without changing the layout.
Long sentences are harder to follow, especially for people reading on a phone, in a second language, or with a learning disability.
Long or technical words can make even short sentences hard to read. Choose simpler words, like “use” for “utilize,” and check the page with the text readability checker.
Aim for an average of 20 words or fewer per sentence. Split any sentence over 25.
What to fix
Paste your course content to find acronyms you haven’t spelled out, words your readers may not know, and formal words that have a plainer option.
Separate terms with commas. The tool won’t mark these.
More Resources to Improve Online Learning




Page Structure
Check that a screen reader can read your headings, tables, and hyperlinks, and preview what it announces on your page.
Nothing you paste or upload is saved or shared.Your content stays in your browser and is never sent anywhere.
Save this page to use again
Press Ctrl + D to bookmark this page for later.
Swipe below for more text tools →
Nothing you paste leaves your browser
Canvas, Blackboard, Moodle, and D2L make the page title the H1, so your content should start at H2. Uncheck this for a standalone page or a Word document.
Your outline will appear here
Paste your content, then choose "Check structure"
Your outline, the way a screen reader builds it
Nothing you enter is saved or shared.
Results
We didn’t find any tables in what you pasted. Copy the content again from your published course page and paste it here, or paste the HTML from your editor’s HTML view.
0
One table can have more than one problem, so these numbers can add up to more than the total.
Tables to fix
This checker reviews the HTML structure of each table. It can’t tell whether your header text describes the data well or see styles from the original page, so test important tables with a screen reader too.
Nothing you enter is saved or shared.
Results
We didn’t find any hyperlinks in what you pasted. Plain text loses its hyperlinks when you copy it, so copy the content again from your published course page and paste it here, or paste the HTML from your editor’s HTML view.
0
One hyperlink can have more than one problem, so these numbers can add up to more than the total.
Hyperlinks to fix
This checker reviews hyperlink text only. It can’t tell whether a hyperlink works or whether the page it opens is accessible.
A screen reader works through a page one heading, hyperlink, and image at a time. Paste your HTML or copy from a course page or Word document, to see exactly what it will say and where alt text is missing or a hyperlink is too vague.
Nothing you enter is saved or shared.
Open the HTML editor in your LMS, copy the code, and paste it here.
Copy content from a course page, Word document, or Google Doc and paste it here. The preview reads the headings, images, hyperlinks, and lists that come along with what you copied.
What a screen reader announces
This preview is an approximation, since each screen reader announces content a little differently. Test the pages students use most with a screen reader too.
Many learners with low vision zoom in to 200% or 400%. At that size, a wide table, embedded video, or long web address can extend past the edge of the screen, so they have to scroll sideways on every line to keep reading.
Paste your content to see how it looks when a learner zooms in to 200% or 400%, and find anything that makes them scroll sideways to keep reading.
Nothing you enter is saved or shared.
Some LMSs shrink images on their own and some don’t. Leave this off to see the worst case.
Visuals
Write alt text for images and equations, and fix caption files so people who can’t see or hear your content still get all of it.
Nothing you paste or upload is saved or shared.Your content stays in your browser and is never sent anywhere.
Save this page to use again
Press Ctrl + D to bookmark this page for later.
Swipe below or more text tools →
What is alt text?
Alt text is a short written description of an image that screen readers read aloud, so someone who can’t see the image gets the same information from it as everyone else.
Good alt text describes what the image is and why it’s there, not just what it looks like.
If you had to explain the image to someone over the phone, what would they need to know?
Tips:
- Don’t use unhelpful phrases like “image of”
- Aim to keep it under 125 characters
- Don’t include alt text for decorative images
Alt text photo example
Here’s how to answer the questions in the builder:
- Who or what is in the image? A hiker with a large backpack and blue helmet
- What are they doing, or what is happening? Climbing a rocky slope with trekking poles
- Any other important details? Fog covers the mountains

The tool creates this: Hiker with a large backpack and blue helmet climbing a rocky slope with trekking poles. Fog covers the mountains.
Chart example
Here’s how to answer the questions in the builder:
- What kind of chart is it? Bar chart
- What does it compare or measure? Car sales by brand, January to March
- What is the one thing the reader should take from it? Ford fell each month while Chevy and Dodge rose
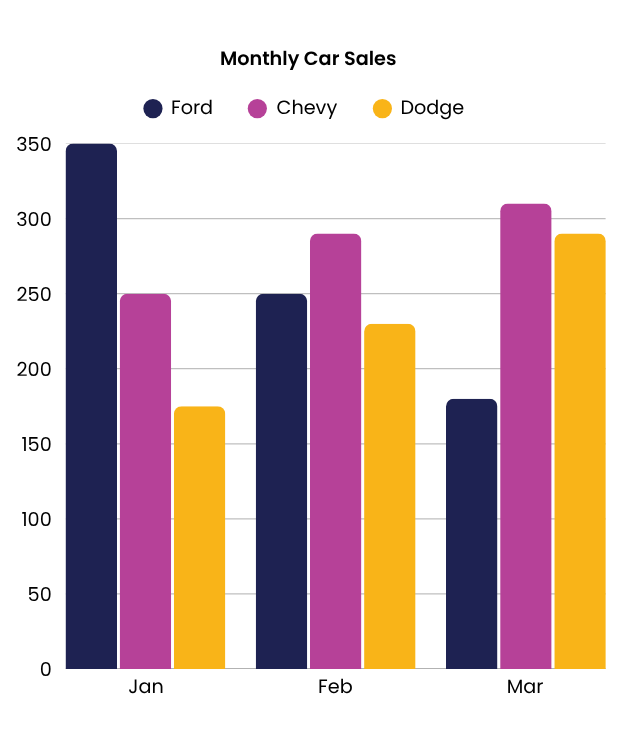
The tool creates this: Bar chart of car sales by brand, January to March. Ford fell each month while Chevy and Dodge rose.
Your alt text
The builder writes a template sentence. Read it out loud and change anything that doesn't sound like you before you use it.
File naming best practices
Rename the image before you upload it. Some editors fill in the file name as alt text, and screen readers read the file name out loud when an image has no alt text.
- Describe the image in three to six plain words with hyphens between them.
- Start with the subject of the image instead of the type, like car-sales instead of bar-chart.
- Skip spaces, underscores, symbols, and words like final, v2, or copy.
Examples
-
Instead of
IMG_4471.jpgUsehiker-snowy-hillside.jpg -
Instead of
Chart_FINAL_v2.pngUsecar-sales-by-brand-january-march.png -
Instead of
Screenshot 2026-10-30 at 3.53.51 PM.pngUsecanvas-quiz-settings.png
Your file never leaves your computer. The tool opens it in your browser, so nothing is uploaded, saved, or shared, and your original file stays the same.
Drop your caption file here to start editing
WebVTT (.vtt) or SubRip (.srt). Download it from Panopto, Kaltura, YouTube Studio, or your LMS.
or
Fix the mechanical things automatically
Pick what you want changed. Nothing is rewritten, and you can undo the whole thing.
What the automatic fixes actually do
- Put captions in time order
- Sorts by start time. This is off by default because it moves captions around, and a caption that starts too early is usually a mistyped timestamp rather than a caption in the wrong place. Correct the time in the box and the problem goes away without anything moving.
- Break lines at 32 characters
- Rebreaks each caption into at most two lines. It prefers to break after a period or comma, then before a conjunction, and it will not leave "the," "a," or a preposition stranded at the end of a line.
- Split captions with too much text
- When the words cannot fit in two lines of 32, the caption becomes two or more captions, split at a sentence boundary where one exists. Time is divided between them in proportion to how many characters each holds.
- Separate overlapping captions
- When one caption is still on screen as the next begins, the earlier one is trimmed to end just before the next starts. If trimming would leave it under 0.7 seconds, nothing is changed and the caption stays flagged for you, because shortening it that far would be worse than the overlap.
- Slow down fast captions
- Extends the end time into the silence before the next caption until reading speed is under 21 per second. It never overlaps the next caption, never runs past 7 seconds, and never shortens a caption. If there is no silence to borrow, the caption stays as it is.
- Lengthen very short captions
- Anything under a second is extended toward a full second, again only into available silence.
- Capitalize sentence starts
- Capitalizes the first letter of a caption that begins a new sentence, capitalizes after a period inside a caption, and fixes a lowercase "i" standing alone. It does not touch proper nouns, so names still need your eye.
Equations are usually added as screenshots, and a screen reader skips a picture with no alt text, so learners never hear the equation. Typing it doesn’t help because x^2 is read as “x caret 2.”
Type the equation and this tool writes:
- Alt text for the screenshot, written the way you’d say it aloud, so a screen reader reads “x squared” instead of “x caret 2.”
- MathML code to paste into your LMS’s HTML editor to put the equation on the page instead of a screenshot
Preview
Loading the equation tools
Alt text
Paste this into the alt text field for an image of the equation.
MathML
Your MathML will appear here.
Paste this into your LMS’s HTML editor. Some LMS editors remove MathML when you save, so reopen the page afterward to make sure the equation is still there.
Assessment Accommodations
Accommodations are different for each person, so Honorlock lets you describe them in plain language, and our certified proctors follow what you wrote. Accommodations, along with specific proctoring settings within Honorlock, also offer the flexibility to deliver secure assessments in different formats, such as:
- Written assignments and essays
- Hands-on tasks in actual software, like fixing a balance sheet in Excel or writing code in Python
- Open-book exams that allow printed textbooks, digital resources, or both
- Math exams where people work out problems with pen and paper
Nothing you paste or upload is saved or shared.Your content stays in your browser and is never sent anywhere.
Save this page to use again
Press Ctrl + D to bookmark this page for later.
Accommodation builder
Select the person’s approved accommodations. Your results will include a description you can paste into the proctor instructions for their exam in Honorlock, an email to send them, and a list of settings you may need to change in your LMS or assessment platform.
Proctoring
Proctor noteYour results
Nothing selected yetNo names are needed. Replace [Name] with the person's name after you paste.